Tuesday, June 22, 2010

KitchenAid Makeover!!!

***Since I have had several ask...THIS PAINT HOLDS UP! It is washable and heat resistant- it is not your normal spray paint, it is an epoxy- basically the same paint your car has!***

I don't think that I have been this proud of a project in a long time! Probably by far one of my favorites! (besides my desk!) About 3 years ago, my husbands aunt died and I inherited her old kitchenAid. We guess that it is over 20 years old! I am so grateful, but to be honest - it had seen better days and wasn't exactly the color I would have picked. A year ago I was in Home Depot buying spray paint (surprise, surprise) when I saw paint for appliances! That's when a little light bulb went off in my head! "I can paint my kitchenAid!!!" So yes, it has taken me a year to do it! (does anyone else have that problem?)
So without further ado...
BEFORE:

AFTER:

BEFORE:

AFTER:

So if you want to paint your KitchenAid, or any other appliance for that matter, here is how...
1. Remove all removable parts. (super easy - like 3 minutes easy!)


Once you remove the back thingy, you will see screws to remove the silver band that wraps around the front - I was originally going to just tape mine off until I saw it only had 2 screws holding it in place.

The bowl holder has 3 screws...

2. Clean all that GUNK out of every crevice (probably the hardest part!) Who knew cookie dough could be so invasive?!?

3. Lightly sand the surface. I used a foam sanding block so that I could easily sand all the curves. It doesn't need much - just enough to rough up the polish. (NOTE: DO NOT sand anything you are not painting- it will scratch it up!)

4. Tape off anything you don't want painted, I did cut the tape around those screws (I just get picture happy!)

I just put a plastic sandwich bag over the wires in the back and secured it with a rubber band! (rocket science- I know!)

Now for the FUN part!
5. Spray paint! I used Rust-Oleum Appliance Epoxy (black gloss)

Follow the directions on the can carefully

***If I had to do this again, I would first tape off the bottom half and spray the top arm thing, then tape that off, and spray the bottom. I found that the "dust" from the spray dulled the shine on the other parts, so it took multiple coats - which makes bubbles if you do too many - which I did, so learn from my mistakes!

Now it is all pretty and shiny black! But am I satisfied? Am I ever satisfied??? :)
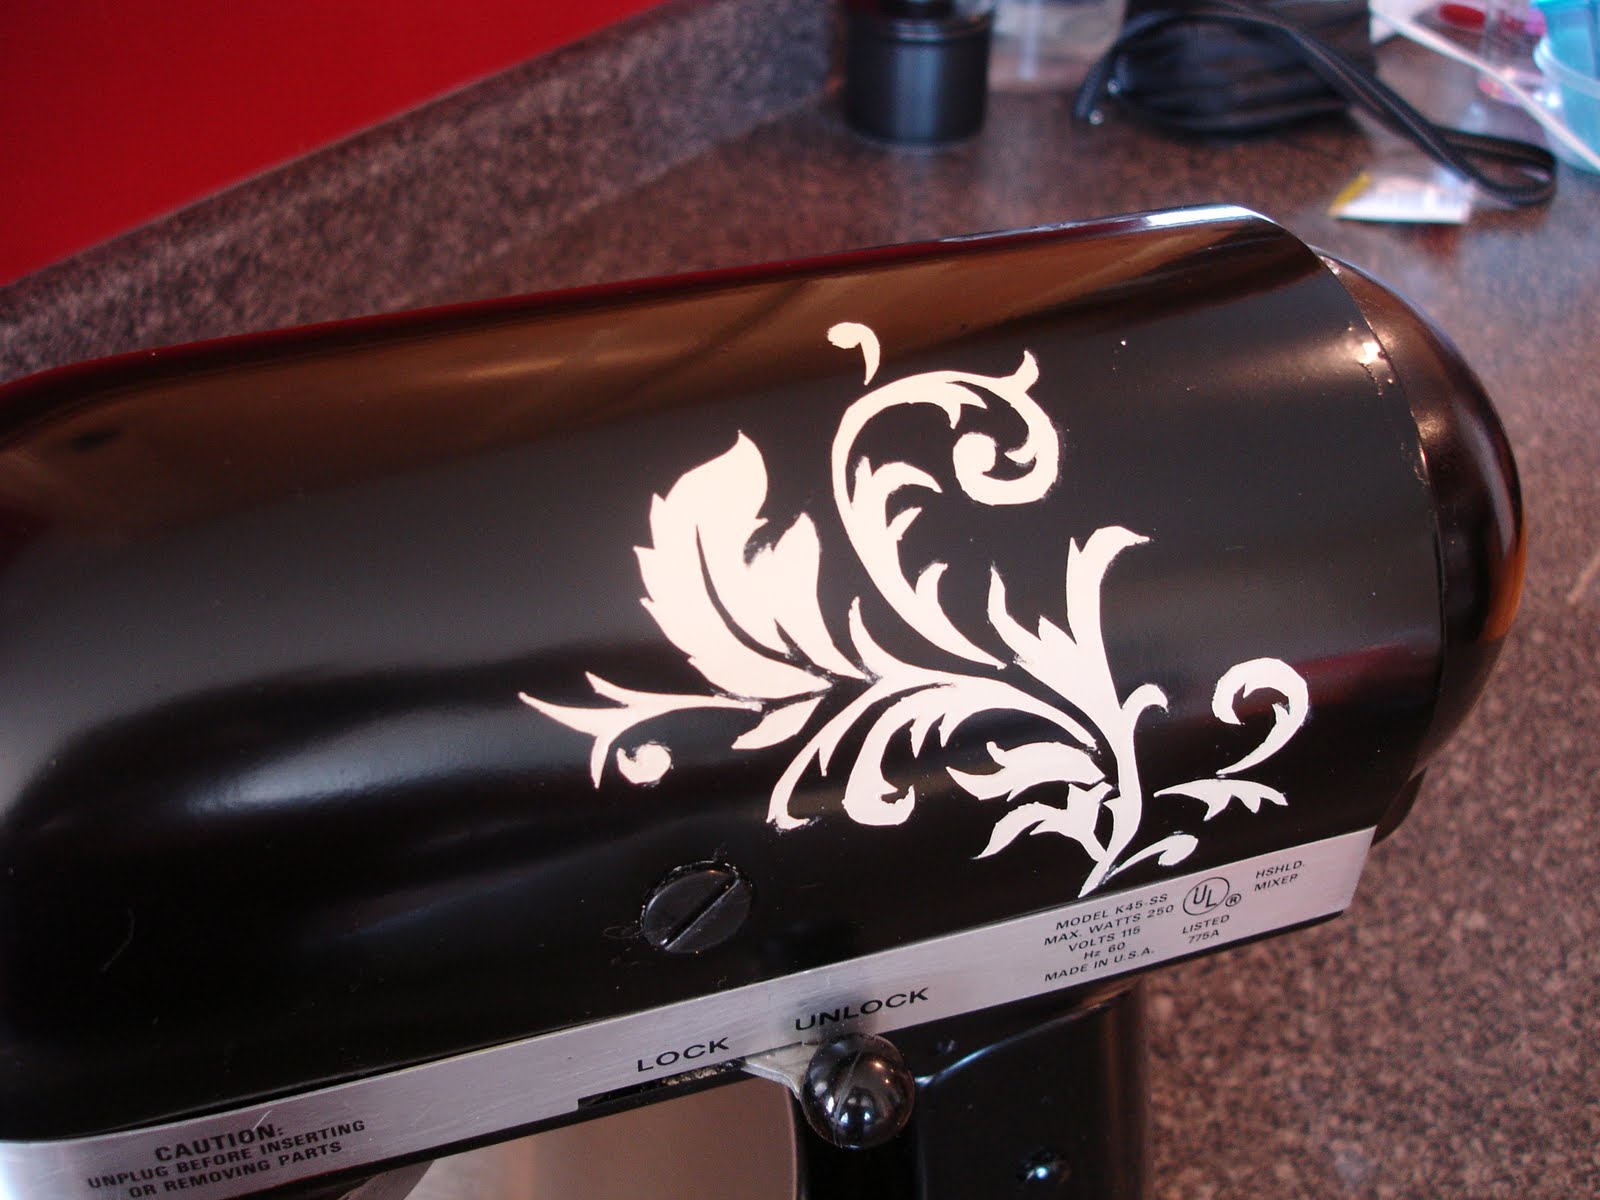
6. Tattoo time! (I like to call it a tattoo)
***Again - learn from my mistakes! If I had been smart, I would have realized that I painted the "tattoo" the same color my KitchenAid was originally, so I should have just put the vinyl on first then painted it black! Would have saved me time and a can of spray paint - oh well - be smarter than me! Trust me, it's not hard to do! :)

I found a design I liked on a piece of scrapbook paper from Hobby Lobby. I cut out a small piece of vinyl and taped them both on my window so that I could trace the design onto my vinyl. (the light from the window makes it possible to see through your vinyl)
7. Cut out the design with an exacto knife. Take your time, so that you don't get cuts where you don't want them - your paint will leak through those cuts.

8. Put contact paper, or transfer paper on the RIGHT side of your vinyl. DO NOT SKIP THIS STEP! If you don't do this it will be nearly impossible to transfer it to your project -trust me, I learned the hard way and had to redo my stencil!

9. Peel off the back of the vinyl - it should now be "sticky"

10. Apply it to your kitchenAid - it is rounded, so really rub those stencils on, try to flatten all creases as good as you can so that the paint will not leak into them.


11. Cover anything you don't want the contrast paint on (I forgot to take a picture)
12. Spray with a contrasting color (I used the same Appliance Epoxy just in cream)
OHHH!!! And don't forget to spray your cord to match! I just used 99 cent walmart black matt paint for the cord.
13. Unveil your results!!!
(I was giddy with excitement at this point! I couldn't believe how gorgeous it was!!!)


I love the little tattoo I did on the opposite side!

I debated putting another small one at the bottom of the base, but was afraid it would be too much.


MORAL OF THE STORY: Everything has potential!!!
So go spray paint something!!!
Am I the only one who gets giddy after spray painting? I think it is kind of like shaving for the first time, when you are done you want to shave more, so you shave your arms too! I have been searching my house for more things to spray paint!


I am linking up to the CSI challenge- wish me luck!!!
Visit thecsiproject.com

Monday, June 21, 2010

Summer Cake

I made this cake two years ago for a relief society party. Unfortunately I didn't take pictures of the process, but it is pretty easy to explain. It is actually really easy - just a little time consuming - but way worth it!


What's a burger without fries? (and fry sauce!)

WHAT YOU NEED:
*3 cake mixes. 1 chocolate (burger) 1 yellow (bun) and 1 angle food cake (fries)
*Frosting (I used homemade)
*Fondant (for cheese and lettuce)
*Strawberries
*Cool Whip
*Rice crispies (sesame seeds)

HOW TO:
1. Bake yellow cake as directed in two 9 or 8" rounds (this will be your bun) Fill one pan more than the other (this will give you a nice mounded top for your bun top - and a thinner bun for the bottom. (I cut the rounded top off the bottom only)
2. Bake one 8 or 9" round for hamburger patty (use the same size pan as your buns) - if you want it extra thick bake two and stack together. I only used one.

3. Frost: Add yellow and red die to frosting until desired bun color - frost bottom bun.
4. Mix extra chocolate cake crumbs into your chocolate frosting so it is lumpy, this will give it the burger texture, and frost it on top of your bottom bun. Make sense?

5. Fondant time (this only takes a very small amount) mix in yellow die (and a tiny drop of red) to get the cheese color. Roll it very flat and cut into squares, then cut the squares in half crossways to make triangles.(you don't need a whole square because it wont show)
To make the lettuce die your fondant green and roll out randomly. I tore the edges and just kind of crinkled them till it looked like lettuce.
Put these on top of burger patty.

6. Put yellow and red frosting in tubes and squeeze around edges for mustard and ketchup.

7. Put on the top bun and frost, then add rice crispies for sesame seeds.

8. FRENCH FRIES: Mix the angel food cake according to directions. Add yellow food dye (just a little) you might need a drop of red. Bake it in a sheet pan (large cookie sheet with a 1" edge on it) I can't remember the bake time - but it is shorter than the time for a 9x13. Just watch it. When it is done, cut the cake into 1"x 4" rectangles. I did mine different lengths - like fries! :)
9. For the "ketchup" and "fry sauce" (for us utah and idaho folks)
Ketchup: put strawberries in a blender and puree them. Then add desired amount of sugar. I bought cheap bottles at walmart (dollar store has them also) and cut a larger opening.
Fry Sauce: coolwhip with yellow and red food dye (EASY!)
When you eat the fries put the strawberries and coolwhip on them - so yummy!!!
10. Sit back and enjoy the yummy cake and all the "ohhhs" and "ahhhs!" You will get them!

Thanks to BRIDGETTE and REBEKAH at All Thingz Related for picking this as one of their Favorites! I am honored!!!
All Thingz Related

Monday, June 14, 2010

Obssesed

Okay, so I have an obsession with green wreaths right now, especially boxwood ones! My Front door has a very large one...

And as if that is not enough, I needed one on the window to match...

And for some reason, I still wasn't satisfied, so I had to go and add another in my house (which is completely visible when you walk in from my wreath infested porch).
Here is how to make one...
...Thanks to Rebekah at All Thingz Related for the idea! Go HERE to see hers (She used hers on double pantry doors - so freakin' cute!)
I bought a boxwood "bush" at Hobby Lobby for $4, and a grapevine wreath for $1.25.
I also used hot glue, but that is optional. (I just have a one year old who attacks all my decor to test its durability, so I glued mine)

1. Cut apart the "bush" with wire cutters, then cut each stem in half so they aren't so long.

2. Add a dab of hot glue to the end of the stem- no brainer - I know!

3. Insert glued end into grapevine wreath. Continue all around, evenly filling in all gaps.

4. Be more careful than I was - I ended up with 2 nasty burns!!! Why is it I can use power tools and not hurt myself, but the second I pick up a glue gun I get injured? (knock on wood)

Tada!!! I LOVE my new $5.25 wreath! I'm not too sold on the rest of the decor, but the wreath is there to stay! Yes I know there are nails sticking out of my finial - I stole it off the fence of my old house before I moved for a keepsake! :) And I wasn't strong enough to pull the nails out, and too impatient to wait for my husband to do it before I took the picture.

Thanks again to Rebekah for the inspiration!
Confession - I want to make two more slightly different boxwood wreaths for my laundry room makeover- am I going overboard???

Wednesday, June 9, 2010

Summer Porch

For 4 years now, I have had a dream of what I wanted my porch to be like, I wanted it to be an extension of my home, and I wanted it to be beautiful. The front of your house is the first thing people see, and I wanted it to make a good impression. Here is what it looked like before, not bad, but no WOW factor.


After years of dreaming, I finally have my porch the way I want it!!!


I Bought my oval wreath at Tia Pan - it was pricey but I had a rare coupon, so I splurged!

I wanted a wreath to match my door one, so I bought a boxwood garland for $6 at Tia Pan, and wrapped and wired it to a $1 wire frame from Hobby Lobby (TOTAL = $7!)

I bought this table on KSL for $7.50:

I used some leftover red spray paint to beautify it. I also added some black glaze to darken and antique it a bit, but I took this photo before I did that. oops! Here's the after:

I bought $12 worth of fabric at JoAnnes for the pillows, used my serger to sew a 16x16" square, then I stuffed it with stuffing I have had for years and stitched them closed!

It was a long time coming, but WAY worth the wait!!! My husband and I spend so much time in our little rockers, (funny, I always thought we would be old when we would sit on rockers on the porch - maybe we are getting old?) Those rockers have already had miles rocked away on them, LOVE it!!! (Just one more look!)

Now I can sit back and enjoy a warm summer in the shade of my lovely porch!
Happy Summer!
Related Posts Plugin for WordPress, Blogger...